Showing posts with label DIY. Show all posts

Celebrating 40 years on Catalina: Invitations

May 8, 2014

For my grandparents wedding anniversary/vow renewal I put these invitation suites together to go out to family and friends. We chose blue, silver and white as the color scheme mainly because my grandparents had blue carnations at their wedding. It worked well because we were going with a beach theme for the weekend since we were on Catalina.
 
I really like the look of watercolor painting and thought it would be perfect for these invitations. It was super easy to do and I think it gives them a unique look. I kept with the ombre theme we had going on with the decorations, and just went to town painting. 
Because this was a weekend long event with a lot of different things going on, I designed a basic itinerary so that everyone was on the same page. A few details changed the week before so I printed up some new ones, added a couple strokes of water color paint to the bottom and we stuck them in the welcome bags. It worked out perfectly because everyone was able to know when and where to meet up, without there being any confusion. 

I created contact cards with our numbers and e-mail address on them for information. Usually an RSVP number would have been added to the invitation itself, but seeing as how we knew everyone was going already, and there were multiple people with the details, I thought this was a better idea. I cut them down to size, added watercolor, tucked them into glassine bags and attached the whole thing to the invitation suite with a blue paper clip.
After I put everything together and tucked it inside the envelopes, I added a strip of washi tape and stamped "get excited" on the back to seal it off. Keeping with the watercolor scheme I had going on, I used watercolor painting to add the names and addresses to the front. 

The invitations probably weren't completely necessary because everyone was on board already and my aunt was sending out a way more detailed email later on, but I think it gave the whole event something special, and we all know how much I love paper products!

Sources: Get Excited Stamp (discontinued) / Envelopes / Notecards

Read more about the details that went into celebrating my grandparents 40th wedding anniversary here and here.

Celebrating 40 years on Catalina: Decorations

May 6, 2014

In case you missed it, yesterday's blog post explained why we were on Catalina and what we did while we were there. 
 
As I said in yesterday's post, my aunt, mom and I spent the past year planning, scheming and DECORATING. We went with a light blue/silver/white color scheme based around the idea that my grandparents had blue carnations at their wedding. We got a lot of use out of my Shillouette die cutting machine.

We thought it would be awesome to have whoever decorated the cake replicate my grandparent's original cake design. This was more of a project than we thought it was going to be. About a month away, our original cake lady said she was no longer on the island. Luckily Katrina Lee of Island Cakes was flexible and able to grant our wishes. My Aunt Sally, who helped decorate the original cake, called her and tried to explain to her what it looked like because the only pictures we had of the original are pretty blurry. If that wasn't a hassle, trying to figure out the cake topper was. We were unable to find ANYTHING that resembled the top of their original wedding cake so we just got wood veneer "40" numbers and painted them silver. My aunt used left over blue carnations from the center pieces as accents around the top and bottom of the cake. The blue on the cake was a little off, but all in all it was gorgeous and absolutely delicious!
One of the things I wanted to incorporate were two Geronimo balloons with tissue paper fringe. I thought it would make a great accent to "frame" the ceremony and have as decorations. My aunt spent the better part of Thursday night fringe-ing away. She also incorporated ribbon and had cut out hearts from POW paper and attached those. These tails were amazing. Too bad the ONLY balloon lady on the island wasn't willing to work with us and fill up our balloons. Don't mind the fact that my aunt had called her a couple months before and confirmed that she could fill up our 36" balloons. Oh well, we ended up getting clear balloons and clustering them together. It wasn't our vision, but it worked. You better believe we brought those fringe tails home with us! They are too adorable to go to waste!
Some of the other decorations we "DIY"ed included the Happy 40th anniversary banner with a tissue paper fringe background, the centerpieces, water bottle labels, "BROWN" block letters, the photo booth background and props, huge "40" made up of black and white photos, different wall hangings with quotes my grandpa wanted made, a photo book, and CD and packaging that was placed at each persons place setting.


Because this was a very small gathering (just my grandma and grandpas kids + their kids) there were a lot of people that are close with my grandparents, that were not able to attend. I had the idea to put together a guestbook of notes from other family members and close friends not attending, including notes from those attending as well. I sent out a 4x6 blank note card with an accompanying note describing what was going on, and directions for filling it out and getting it back to me. I placed the returned notes into a Studio Calico handbook and used these page protectors.  I tucked the note I sent out to family and friends in the first page protector inside the book, embellished the front and called it a day.

We wanted to do a sand ceremony during the night. My aunt found this heart shaped glass bottle with a cork top, and two other glass bottles to hold sand. It's hard to see in the picture but we got the heart glass bottle engraved with "Larry & Joyce 40 years" on one side and "Catalina 2014" on the other side. My good friend over at J & M Trophies took care of the engraving and we couldn't be happier with the finished product. Everyone was able to put a little bit of sand into the bottle and at the end, my grandparents finished it off.


Yes, we had to lug everything over on the boat and assemble a lot of it there. It was a hassle, but so so worth it. 

My aunt wrote a more detailed blog post about our decorations over on her blog.

Read more about the details that went into celebrating my grandparents 40th wedding anniversary here.


DIY: Gallery Wall

April 22, 2014

Gallery walls seem to be a thing right now, and that is perfectly okay with me. I had a small scale one in my last apartment, but was super excited when I saw this big open wall in my new apartment. I knew instantly what was going to go up. A gallery wall is a fun way to make a big impact and totally customize it. Every time a new person comes over, they go straight to this wall and look at all the different things I have hanging up. I love that my gallery wall reflects me. I especially love that I was able to incorporate some special pieces from our trip to Europe. We acquired two small hand painted paintings from local artists in Rome, and two prints of paintings from Paris. Other things incorporated into my gallery wall are a few of my favorite art prints, photographs and a few quick DIY projects thrown in.  
There are a lot of tips and tricks floating around the inter-webs for hanging up multiple frames in the form of a gallery wall. I just usually measure out the width, or height, of my wall space (which every I am more constrained by) and then leave the tape measure locked at that measurement on the floor. I just start arranging and rearranging my frames until I find a combination that works for me. From there I have my handy man hang everything up. He does a good job and does the job in about half the time it would take me.

  1. Shopping Bag, from Laduree
  2. This is your life Canvas print, by Louise Carey
  3. Silhouette wall hanging DIY
  4. Buildings of Paris print, by City Fabric
  5. Be You Print, by Sugar Paper
  6. DIY Paper mache letter with turquoise paint
     * Personal pictures I had printed.
     ! Paintings and prints we picked up from our travels to Europe.
As far as frames, I have accumulated many of them over time. Some from IKEA and Target and others from places like Marshalls and TJ Maxx.  I love that there is a mix of frames too. I know my mom and grandma would have a fit that the frames don't all match, but I think that's what I like most about my gallery wall.

Here are some of my favorite frames: Target 1 / Target 2 / IKEA 1 / IKEA 2 / IKEA 3 / IKEA 4 / IKEA 5
I think my love of Paris is pretty evident from my gallery wall alone; my biggest art print is of Paris, I have 2 pictures of the Eiffel tower, 1 art print of the Champs-Élysées, and the most adorable shopping bag we got with our macaroons from Laduree.  One day we will make it back. In the mean time, I'll enjoy looking at the momentos in my gallery wall.

PS: Coffee table DIY post will be up next week!

DIY: Card Keepsakes

March 25, 2014

Since my birthday just passed, I thought I would share with you how like to organize cards I receive from family and friends. This is a quick way for me to use up some of my never ending supply of scrapbooking supplies, and release some of my pent up crafting energy in between the craziness of grad school life. I have this creative side that seems to get pushed aside by the mounds of assignments and papers that need to be attended to during the school year. This project can take about 30 minutes to an hour and is a great way to keep cards you are gifted from love ones, year after year.
I start by cutting a piece of card stock as big, or a little bit bigger than the biggest card I have and then go to town embellishing the front of it. You could always add a piece of cardstock at the end of all your cards as a backing. Take your smallest card and hole punch two holes on the left side of your card. Use that card as your template as you punch through the rest of your cards and your cover. Add two book-rings and your done!


Sometimes I am gifted gift cards, or pictures of the presents my grandma or mom bought me but just didn't order in time for it to arrive in time for my birthday. I tuck these things into the envelopes that accompany the card and include these envelopes as well, after I use the giftcards of course.
This would be fun to way to keep all the Christmas or Holiday cards you get year after year, and display as a coffee table book around the Holidays. Also, this would be good as a keepsake for cards from children's birthdays, weddings, graduations, and wedding or baby showers. Or, you can start a collection and add anniversary cards each year!  

This is a fun project that could get those creative juices flowing, or even if you aren't into scrapbooking and crafting, this is a really simple DIY project that takes no time at all and is a great way to keep your cards organized from whatever occasion!


DIY: IKEA hack campaign dressers

March 4, 2014


If you know me, you know that I have a very distinct style when it comes to decorating, and it even spills over into my wardrobe. I am very traditional and classic when it comes to my design style. Lots of black and white, with some clean stripes and polka dots mixed in. Very traditional. So these emerald green bed side tables seemed completely out of my element, but it was something I didn't have to think twice about. When I saw this DIY floating around pinterest, I knew it was a must in my apartment. And, with the black and white theme I have going on-it's very easy to add pops of color.


Materials:

I found inspiration through these other DIY's: DIY 1 // DIY 2

Instructions:
  • Once you have your IKEA Rast Dresser, first thing you will want to do is fill the holes with wood putty where you would have put the knobs that came with the dresser. Let dry.
  • Once the wood putty has dried, sand over each spot to make it flush with the rest of the wood.
  • Paint all the pieces, making sure to paint the 2 long side pieces since there will be overhang at the top. We made the mistake and had to add the paint once we assembled the dressers. 
  • Let the paint dry overnight.
  • Next, you're going to mark out where you will place your corner pieces. Place a corner piece on each of the drawer face corners and with a sharpie or pencil, place a dot in between the holes of the corner pieces. 
  • Drill out small pilot holes in order to ensure not to split the wood. 
  • Then drill out the holes slightly smaller then the screws. Make sure to screw in the screws slowly so you don't end up stripping the screw heads or splitting the wood.
  • Determine where you want your drawer pulls placed and mark out your drill marks for those as well. 
  • Drill small pilot holes here as well just like the corner pieces. Then drill out the holes slightly smaller then the screws.
    • Make sure the screws you have are short enough they don't go all the way through to the other side. 
  • Now to the hard part, decyphering the IKEA instructions to actually assemble the dresser!
    • Remember, you aren't going to make use of the knobs that came with the dresser.
We ended up doing two-one for each side of the bed, so all of our materials ended up being doubled. These are trendy, yet functional since you are able to use them as dressers and still small enough to double as side tables. These bed side tables are completely doable on a college students/newlyweds budget! And, as an added bonus-this DIY project didn't take us very long to complete-maybe a day and a half, painting included.

PS: I owe most of this DIY to my handyman. I'm really lucky to have him around to put up with my crazy DIY's! Love you T.


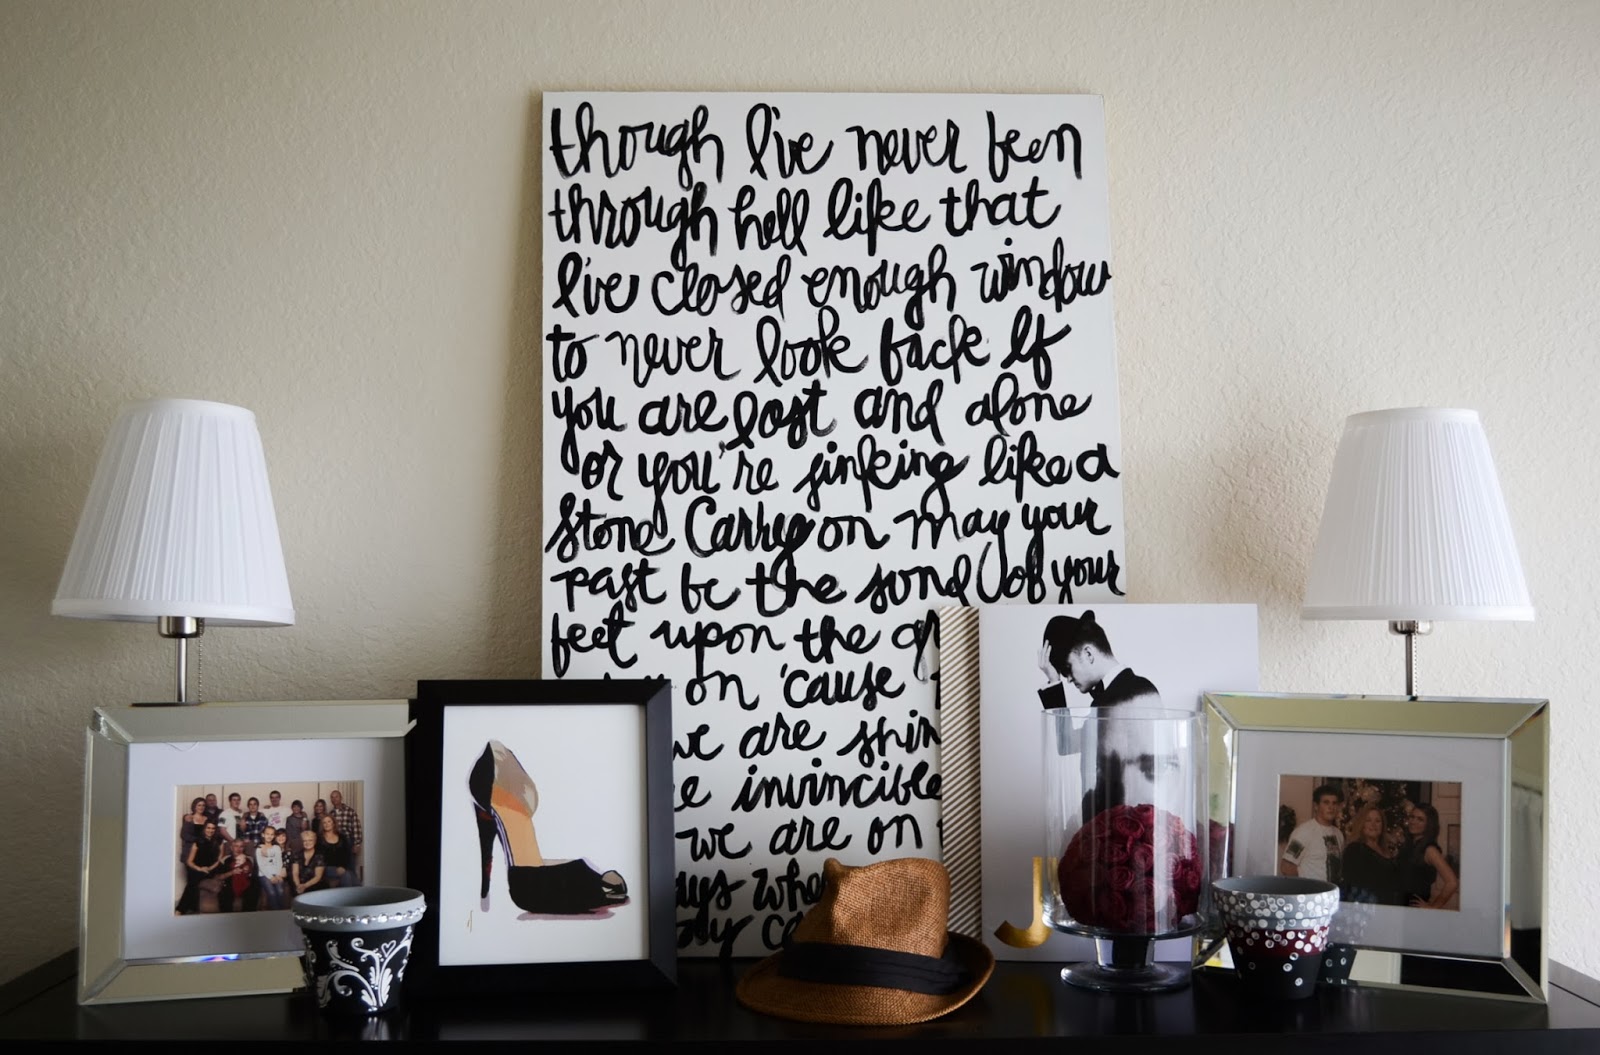
Scripted Art

February 19, 2014

 Completely 100% inspired by this amazing lady. The black and white hooked me and the script writing pushed me over. This was a fun project that I was able to complete in an afternoon-drying time and all. The hardest part was deciding which lyrics I wanted to display.

 I ended up choosing the chorus to Fun.'s "carry on." JT's Mirrors was a close second. Travis introduced me to Fun. before they became wildly popular. Their first CD is still my favorite but Carry on has to be my all time favorite Fun. song. I really like the lyrics of the song "if you're lost and alone, or you're sinking like a stone carry on." As a busy grad student, it's this line that reminds me to keep going. It's nice to have a visual reminder to "carry on" no matter how busy or crazy life may get.
First, I used white acrylic paint cover the entire canvas as a base coat. Once that dried I went to town on the script not worrying about completely filling in the letters with paint. I went back over the letters a second time, not being extremely careful about getting inside the lines.

As an added flair, I decided to paint the edges of the canvas with my favorite gold acrylic paint. Although you can't see it looking straight on, I think it gives it a little something extra. Once the paint dried, I placed it on top of my bookshelf anxious to see how it would fit in, with ambitions to hang it up, but I kinda like it leaning against the wall.
Definitely an easier project that makes a huge impact on an otherwise blank wall!

DIY Lighted Letters

January 22, 2014


This is a DIY I've had on my never ending want-to-DIY list for quite a while. I saw the tutorial from the a beautiful mess girls and I knew I had to crank mine out. This project came together fairly easy, in an afternoon with the help of Travis. I rushed out to get the letters to spell "JOY," but they didn't have the complete set. I was bummed but then Travis reminded me I had the exact letters I needed in storage! Originally, I bought these letters from JoAnns for a DIY Anthro knock off project, but since they were just collecting dust, I figured I would re purpose them! 
First, with a pencil, I marked out where I wanted to drill the holes for the lights and then when I was sure of the spots, I marked it with a sharpie. I didn't worry about the sharpie marks because I knew I was going to be painting over them later. My handy man then drilled out the holes for me. He chose a drill that was a little smaller than the lights so that the lights would fit snug in there.  Next, because the letters were enclosed, we took the backs off to expose the holes. This is when I decided to paint the letters a Martha Stewart acrylic gold. They took about two coats of paint and they dried fairly quick.
 After the letters dried, we strung the string of lights through them, making sure we started at the bottom of each letter and ending back up at the bottom of the letter. We did this so we could string garland in front of the letters, when up on my mantel, and you couldn't see the string of lights going from one letter to the next. I kinda had to play with the excess string to get it to stay inside the letter. I didn't want to tape it down with electrical tape because I knew I wanted to disassemble this decoration for easier storage.
Pretty simple DIY that doesn't take much time but definitely makes a statement and can be done for any season!

PS: Check out the rest of my Christmas decor in this post!